When building features that rely heavily on animation or on-screen movement, like carousels or parallax effects, there is one accessibility consideration that shouldn't be forgotten. Many of your users may be prone to motion sickness, or other vestibular (inner ear) motion disorders. How can we help these users? As it turns out, we have a few options.
This article will demonstrate how to use the prefers-reduced-motion media feature in both CSS and JS to offer alternative interactions for users that prefer them.
What Is It?#
The
prefers-reduced-motionCSS media feature is used to detect if the user has requested that the system minimize the amount of non-essential motion it uses. - MDN Docs
At its core, prefers-reduced-motion is just a CSS media query, and how you use it will depend largely on your specific styles and animations.
@media (prefers-reduced-motion: reduce) {... your styles}or@media (prefers-reduced-motion) {... your styles}
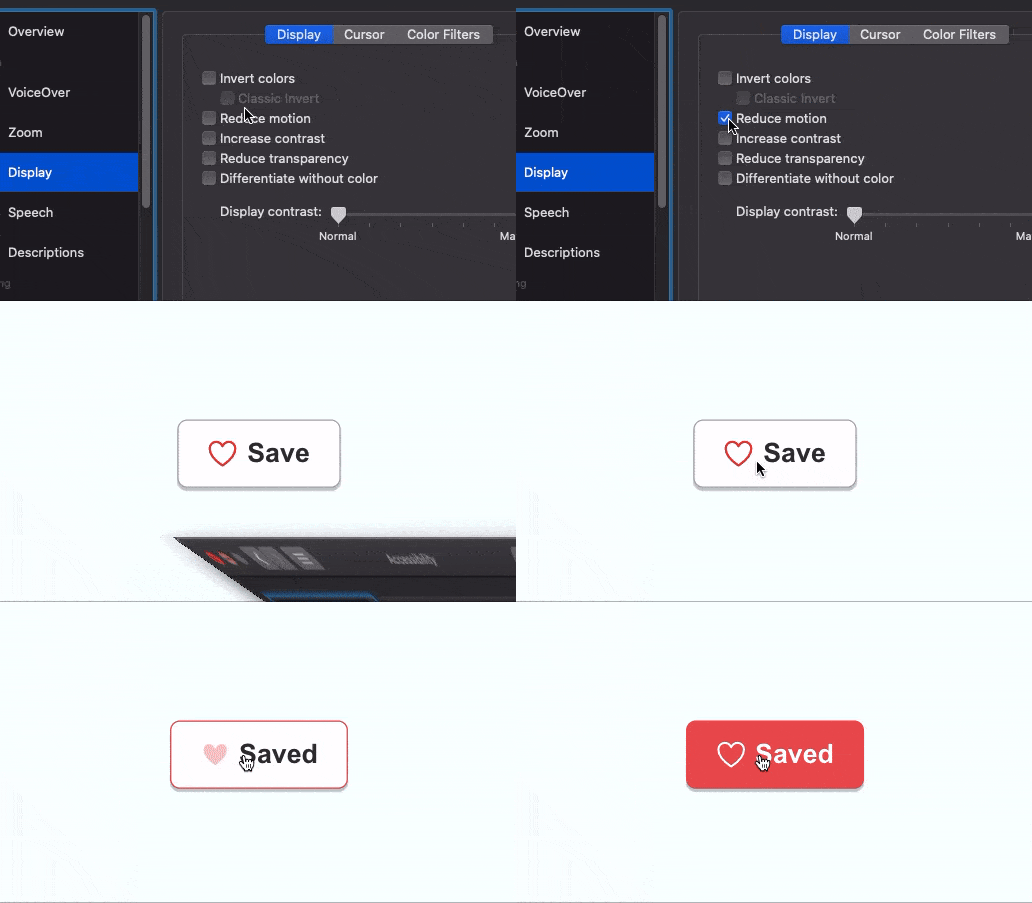
As an example, let's say we have a button that has some animation that could potentially be disorienting for some users.
I won't cover all of the styles used in this example, but you can view the demo and code here.

All we need to do is add a prefers-reduced-motion media query and some styles to make the animation more subtle.
@media (prefers-reduced-motion) {.saved .scale {animation: none;opacity: 0;}}
In order to see it working, let's enable the "Reduce motion" setting.
Depending on your OS and device, enabling reduce motion will vary. On macOS, go to
System Preferences>Accessibility>Display>Reduce motion, or on Windows 10 go toSettings>Ease of Access>Display>Show animations in Windows. See a full list of devices here.
Once enabled, the setting should take effect immediately.

Even though this is a pretty trivial example, it shows that with just one media query, you can scale back your animations and add alternatives pretty easily.
Worth noting: like many things,
prefers-reduced-motionis not supported in Internet Explorer.
Reducing Motion For JS Animations#
The previous example covered CSS, but how can we accomplish this if the animation is handled in Javascript?
One way we can do it is by using the window.matchMedia method, and checking specifically for (prefers-reduced-motion).
const motionMatchMedia = window.matchMedia('(prefers-reduced-motion)');
This method returns a MediaQueryList object that looks something like this:
{matches: truemedia: "(prefers-reduced-motion)"onchange: null}
The key piece that we're looking for is the value of matches. If true, the user has enabled reduced motion. You can then use this value within your Javascript to manually add classes, or turn off specific parts of the animation, depending on your approach.
Taking it a step further, you can also register an event listener to get updates to this value on the fly, much like what we saw in the previous example.
const motionMatchMedia = window.matchMedia('(prefers-reduced-motion)');function determineMatch() {if (motionMatchMedia.matches) {console.log('Reduce motion is enabled');} else {console.log('Reduce motion is disabled');}}motionMatchMedia.addEventListener('change', determineMatch);determineMatch();
Now you can update your animations in real time if a user happens to toggle the "Reduce motion" setting on or off.
Most users probably won't be toggling their OS settings on and off, but using this event listener, you'll be able to react if they do.
Writing a Custom React Hook#
If you're using React, then you might have animations scattered throughout your application components. You might also be using a library like Framer Motion to do your animations.
Since we know how to access prefers-reduced-motion information in JS now, let's add a React hook that will let us package up this functionality and avoid duplicating code.
If you're using Framer Motion library for your animations, a hook with the same name (
useReducedMotion) is included out of the box! Check out their docs for more info.
First make a new file named useReducedMotion.js that contains the following:
import { useEffect, useState } from 'react';const useReducedMotion = () => {const motionMatchMedia = window.matchMedia('(prefers-reduced-motion)');}export default useReducedMotion;
Now we want to add some state. The state is a boolean and defaults to the initial value of motionMatchMedia.matches. This value is what we will return from the hook.
const useReducedMotion = () => {const motionMatchMedia = window.matchMedia('(prefers-reduced-motion)');const [shouldReduceMotion,setShouldReduceMotion,] = useState(motionMatchMedia.matches);return shouldReduceMotion;}
Next add a useEffect hook, along with the logic we used in the previous example.
Within useEffect, and only on the first mount, add an event listener to the motionMatchMedia object. Also, return a function to remove the listener if a component using the hook unmounts.
const useReducedMotion = () => {...useEffect(() => {function determineMatch() {if (motionMatchMedia.matches) {setShouldReduceMotion(true);} else {setShouldReduceMotion(false);}}motionMatchMedia.addEventListener("change", determineMatch);return () => {motionMatchMedia.removeEventListener("change", determineMatch);};}, []);return shouldReduceMotion;}
Then import the hook in any of your components and use the value it returns to manage your animations.
const isUsingReducedMotion = useReducedMotion();
Summary#
This article demonstrated that there are a few easy ways to manage alternate interactions for users that prefer less motion in their browsing experience. It's a quick accessibility win that users will appreciate.
Again, how these tactics apply to your application and animations will vary on the use case, and may make more sense in certain scenarios than others.
For more information on this topic, and more ideas of when reducing motion should be considered, check out this post.
